Tuesday, February 28, 2017

Thing 1 & Thing 2 hats

This is a repost from my old craft blog.  It was a cute and fun craft and worked for a variety of ages.
---------------------------------------------

Last year we made these cute hats for Dr. Seuss's birthday.  I found the idea here and the link to the circle is in the middle of her post.


I printed out 1-3 and let the girls color them.  The older ones had fun using the paper cutter and I helped my 1 year old cut and glue.  Our paper was a little long so we used the "curl with a pencil trick."  It was an easy and fun activity.


Thing 3 was not in the mood for pictures :) 

Monday, February 27, 2017

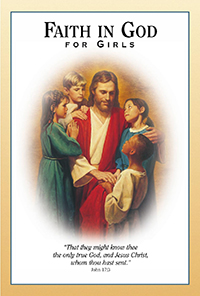
Printable Faith in God Workbook for the Girls


If you have a daughter in Activity days or are an Activity Days leader I hope you will find this post useful.  I have two girls in this group and I was recently called as one of the leaders.  Its such a fun calling.  The Faith In God program has really been on my mind and I really want to make sure my girls get the most out of it.  I want to make sure they are learning and developing their testimonies and not simply going through the motions and just checking stuff off.  

I created a Faith in God workbook for my girls.  Its kind of a companion to their booklet that gives them a space to complete each activity, journal, and will one day be something they can look back on and see all that they accomplished. It has 48 pages and I've included some links to additional pages you can add.  We are still printing and putting it together but they love it!  I thought maybe your girls would love it too.

I went through the Faith in God book and created a page for each activity.  I am printing the whole pack and putting it in a binder.  I'm hoping we can pick an activity a couple of times a month and to work on.   You can print the whole set or pick and choose what works for you. 
We have 14 girls in our Activity Days group so its not real practical for me to make one for each of them due to cost...I wanted to but quickly realize it wasn't going to work.  I am going to use some of the pages as they fit in with our activities. 

Here are some sample from this pack. I tried to keep it printer friendly but also bright and fun at the same time.  


Some of the pages give them a spot to answer the discussion questions, some help them plan FHE or activities, and some just give them a spot for notes or journaling.  Every page is colorful and fun and really appeals to my girls.  I noticed this format makes the activities appear a little more doable in the eyes of my 8 year old and also it looks fun.  They are actually asking to work on their books!  Its amazing.

Please note this is for personal use only. You can download a copy for your daughter or activity days group.  Please send others to this post download their own copy.  


additional pages to add (add next to the corresponding pages)
Learning and Living the Gospel section (from LDS.org) 
Choose the Right-print the pdf

Seriving Others (these are optional but a nice addition)
manners guideline from 30 days handmade
babysitting info from Simple as That I used page 1 & 2

A few extra helps I added to my book.  These were so great I decided to use them instead of making my own.
Articles of Faith-Adorable printable from LDS Lane
Articles of Faith Coloring pages-also from LDS Lane (optional but a fun way to learn)
Scripture Reading chart-cute ones here, here, here, and here.
Faith in God Tracker-My favorite and another cute one here.

The adorable graphics are from Melonheadz Illustrations.

I'd love to know if you use it and I hope you girls love it too!

"Oh the Places You'll Go!" Craft & Printable

Oh, the Place You'll Go! Is my favorite Dr. Seuss book. 
 
Last year we made some hot air balloons inspired by this book.  This was when I wasn't blogging much so I wasn't too worried about pictures...hopefully you get the idea :)
To make them we cut clear contact paper in the share of a balloon.  We cut shapes and squares out of construction paper and stuck them on the stick side.  Once they are done add 2 strings to the bottom then place another piece of clear contact paper to the top to seal.  I cut the second piece after it was on.  cut a small rectangle for your basket and fold in half.  sandwich the yarn and staple the yarn and the sides together.


And with such a great book I had to make a printable as well.  I love the motivational and life lessons in this book.


(To grab a copy for yourself-right click and save to your computer.  You can print at home or use your favorite place.  its sized as a 5x7)

*Affiliate link 

Saturday, February 25, 2017

Dr. Seuss Preschool Mini Pack


Here's a cute little pack for your preschooler.  These activities were inspired by 3 of Dr. Seuss's books.

I did not use actual Dr. Seuss clip art (I wasn't sure about copyright issues).    However I did find the adorable fish and tree clip art from Krista Wallden and love that it makes it a little more versatile and can be used for more themes.  Hope you like them :)


File Folder Games covers shapes, counting, and colors.  I like to print my main pages off and glue in the file folder or I just print on cardstock and use as is.  Its up to you.

Match the shapes


Cut out the fish and sort by color.  You can also use the fish to create patterns.
for the counting we used goldfish cracker but you can also use the fish from the activity above.


I also included some colored fish (there are 9).  Grab a fishing pole and go fishing.  I use this to practice colors.  you can also put numbers, shapes, songs, or whatever you want on the back. 
 There are also 2 cute coloring pages.  Create your own directions (such as color the top fish red, make a pattern with 2 colors on the tree truck) or just have fun and color!


Friday, February 24, 2017

Dr. Seuss Dinner and a Movie Night

This is a repost from my old blog.  It was a really fun night and we are doing another one this year.  Watch for an updated menu in a few days.
---------------------------------------------------------
I really love family movie nights.  Its a fun and relaxing way to hang out together.  I try to do it at least a couple times a month.  Most of the time we have popcorn and snuggle up but every once in a while I like to kick it up a notch and do a theme night.  

It was Dr. Seuss's birthday this week so it was the perfect excuse to watch one of our favorites, Horton Hears a Who.  Before the movie we had a fun themed dinner.  Green eggs (deviled eggs) and "Ham"burgers.  For the green eggs make your favorite deviled eggs and add a little green food coloring to the mixture.  Its a quick and easy meal.  I even made a cute menu to display.  (click on the picture to print your own menu)


If you want to do just a dinner or a different movie you can use this printable instead.


I hope you enjoy this fun family night.

Thursday, February 23, 2017

Dr. Seuss Read-A-Thon and Treat Ideas

Here's another post from my old craft blog.  This is such a fun tradition that we are going to continue this year during our Dr. Seuss week...our read-a-thon!  There is something about snacks that makes reading even more fun.
------------------------------------------------
I'd planned to serve the treats during the movie but everyone was full.  No problem!  We used them today during a read-a-thon.  The kids grabbed pillows, blankets, books, and their Dr. Seuss treats and read wherever they wanted.  


How to Create your own Printable in 5 Easy Steps


I am going to show you an easy and free way to create a printable in minutes!  The hardest part is deciding how you want it to look.  Here are 5 easy steps to help you practice and make this adorable printable.  

Don't feel like making your own you can use mine :)  Right click on the image to save to your computer.


1. Head to PicMonkey.  Hover over the design button and click on blank canvas.

2. Here you can find all of your sizes.  click on the size you want.


 3. Once it opens find the overlay button on side (its the butterfly)  Scroll down to the graphic blooms.
 Find the ones you want and add them to your page.  When you click on them you can change the colors if you want.
 Size and place (I ended up switching this one out for another pink one.)  Its quick and easy.
4. Next add your text.
 I used Flavors for Bloom and learning cursive for the rest.
 You can highlight just the part you want to change.  I made bloom a different font and size.

5. (optional but for this one I liked it)  I went to the frames and used the craft scissor option.  adjust the size and change your background color to white.

Once you are finished make sure you save it.  Use the .jpeg option.  With this program you can't really save as you go.  Once you save it you can't change what you've done but you can keep adding to it.

Print yours out or you can grab a copy of mine!


If you have some graphics or background paper saved to your computer you can use that as well.  Right when you click on the overlay option click on add your own.

Happy Creating!


You may be interested in